Users (Complete Guide)
The User section of Admin Backstage is where all the following user management is done:
User Accounts
User Tags
Organizational Groups
Family Management

User Accounts
Click User Accounts

First page of User Accounts is a table of users
The headers on the table are:
Action
Used to edit (pencil icon) or delete (garbage can) users
First Name
Users First Name
Last Name
Users Last Name
ID
Users Identification
Status
If the user Is Active or Inactive. Users do not need to be deleted they can be made Inactive
User Type
There are three User Types Staff, Guest and Parent

There are multiple ways to filter the data in the table
Display (User Type)
Any
Staff
Guest
Parent
Who are (User Status)
Any
Active
Inactive
Filter (By data within specific fields in the users info)
Lastname
Firstname
Location
Username
Starts with (Begin typing to narrow table results to what is set in filter and matches at least the first three characters)
Click the Blue Arrow after setting the fields to Filter the table

Add, Edit or Delete a User
Users can be Added, Edited or Deleted from the User Account section.

Add/Edit a User
Click Add new User button

General Tab
Name
First (Required)
Last (Required)
Middle (Optional)
Prefix (Optional)
Suffix (Optional)
Friendly Name (Optional)
User Types (Required)
Staff
Guest
Parent
User is (Required)
Active
Inactive
Email (Required)
Gender (Required)
Male
Female

Contact Tab
Mailing Address (Optional)
Physical Address (Optional)
Phones (Optional)

Positions
Position Type (Required)
Staff
Guest
Location (Required)
Dropdown list of school district or schools
Department (Optional)
Manually enter department
Position (Required)
Q
Title (Required)
Q
Grade From (Optional)
Minimum Grade Certified to Teach
Grade To (Optional)
Maximum Grade Certified to Teach
Room Number (Optional)
Teachers classroom Identifier
Work Number (Optional)
Teacher contact number and Extention
Add Position
Click to add updated information
Use to add positions to the employee (ie. high school math teacher and middle school track coach)

Account
Account
Username
User's district email account
Password
Passwords should be generated at district level. We should not enter it here for security purposes.
Confirm Password
Same as above
Account Status
Login Is Enabled
Allows User Access to Mileposts
Locked Out
Denies User Access to Mileposts
Last Activity
Last time the user worked in Mileposts
Last Login
Last time the user logged in to Mileposts
Last Password Change
The last time and date that the users password was changed
Last Lock Out
Last time the user was locked out
Failed Password Attempts
The number of times a user has attempted to login and failed
Failed Password Window Start

Security
Groups
The following list is the available security groups. Users should be added to the group that they most closely belong to. Group Permissions should not be elevated unless the user needs additional permissions (ie some teachers may get elevated permissions because they are a District Test Coordinator, Assistant Principal, etc).
District Administrators
Mileposts Domain Master
School Social Worker
Teacher
ESL Staff
School Counselors
School Special Services
Technology
Mileposts Domain Administrator
School Principal
School Tech Reps
Test Coordinators

Permissions
The following is the list of Permissions that can be granted individually without giving the user all the Permission in a given Group.
Administer all Assessment results
Administer all Student Behavior Incidents
Administer all Student Plans
Become another user
Calendar System Access
Calendar System Setup
Create lists for District Create lists for school
District Program Administrator
Domain Setup
Inventory Access
Manage Assessment result uploads
Publications System Access
Publications System Setup
Reset Passwords
Staff Portal Access
System-level Reporting
User Management
View All Students in School Scope
View private comments
Workorder Admin
Workorder Manage Tickets for Scope
Workorder Setup
Workorder System Access
Workorder View Tickets for Scope

School Scope
All schools in the district are listed here. There are four levels of School Scope
None
The user has no access/visibility to the given school
Limited
The user only has access/visibility to the students in their class
Full Current Year
The user has access/visibility to all students in the current year but not to previous years
Full Historical
The user has access/visibility to all students in all previous and current years.

Audit
Audit Information is a basic timeline including the following:
Created on
Created by
Modified on
Modified by
Sync Information details the basic sync information including:
Sync Source
Syncid
Sync Time

Click Save from any Tab when finished

User Tags
User Tags are used to group staff members with similar characteristics. This is different from groups because groups are associated with permissions. User Tags is for people of a common type (ie math teachers, teachers with less than 3 yrs experience etc)
Click User Tags

User Tags
This table shows all current Users Tags with the following headers
Name
The Name of the User Tag
PublicKey
This is used for database purposes (no action needed)
Users with Tags (Button)
Click this button to see all the users associated with the User Tag

Users with Tag
This table shows all of the current users associated with the specific User Tag. Users can be Added or Deleted here.

Add Tag to User(s)
Click Add Tag to User(s)
Find the user that needs to be added to the User Tag
The user list can be filtered by the following ways
Group
If the user belongs to a Group you can filter on Group
Show all Users (checkbox)
Checking this box shows all users
Adding users to a tag is accomplished by clicking the checkbox next to their name.
Click Save

Organizational Groups
Organizational Groups are used to group users based on their organization/school. This is different from Groups or User Tags. Groups are based on the permissions that a user is granted. User Tags are used to group users based on similar characteristics.
Click Organizational Groups

The Organizational Groups
This table displays the current Organizational Groups with the following headers.
Name
The Name of the Organizational Group
PublicKey
This is used for database purposes (no action needed)
Users in Group (Button)
Click this button to see all the users associated with the User Tag

Organizational Groups can be Added, Edited, Deleted and users can be added to Organizational Groups with the Users in Group Button
Add/Edit Organizational Group
Click Add New Organizational Group or the Pencil for editing an existing Organizational Group

General Tab
Name
Enter the Organization Name
Public Key
This will auto populate when the Name is created (no action needed)
Description
Add a Description of the Organization

Audit
Audit Information is a basic timeline including the following:
Created on
Created by
Modified on
Modified by

Click Save from any Tab

Delete Organizational Group
Click the garbage can to delete an Organizational Group

Add User to Organizational Group
Click Users in Group

This table displays all the current Users in the selectedOrganizational Group with the following headers
Action
Firstname
Lastname
Users can be Added or deleted from Organizational Groups
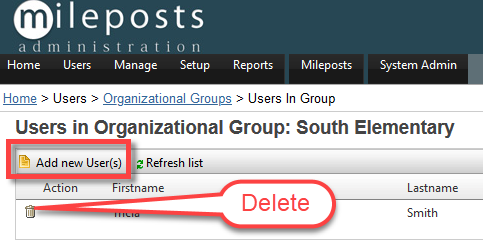
Add New User(s)
Click Add New User(s)
Check the checkbox next to all users that need to be added to the selected Organizational Group
Click Save

Delete
Click the garbage can and confirm
Family Management
In the Family Management section Guardian List and Portal Invitation Codes can be managed
Click Family Management

Here there are two choices:
Manage Guardian List
Guardian List is a table with all the parents that have access to their students Mileposts Parent Portal
Portal Invitation Codes
Is used to generate the pass codes for parents login to the Milepost Parent Portal

Manage Guardians List
Click Manage Guardian List
This table has the current guardians

The Guardian list is a table showing all guardians that have access to the Mileposts Parent Portal. The table can be filtered and guardians can be added, edited or deleted. The table has the following headers:
Action
First Name
Last Name
Status
Has Portal Access
Number of Students

Filters
The table can be filtered by
Last Name
First Name
Type at least three characters of the selected name
Click the Blue Arrow to search

Downloads
The list can be downloaded as an Excel file or a CSV file
Add/Edit Guardian
Click Add Guardian
OR
Click Pencil to Edit Current Guardian

A screen will open. Add or Edit the Guardian information.
Information Tab
This tab is guardian information (Not Student)
First Name (Required)
Middle Name (Optional)
Last Name (Required)
Home Phone (Optional)
Work Phone (Optional)
Cell Phone (Optional)
Active checkbox
This must be checked for the guardian to be active in the system.

Notes Tab
This area gives the user an area for notes. The note pad has the following tools:
Spell Check
Bold Text
Italic Test
Underline Text
Indent
Outdent
Numbered List
Bullet List
Add HyperlInk
Remove Hyperlink
Toggle Full Screen Mode

Contact Tab
This tab is for guardian addresses Mailing and Physical
Mailing Address
Address Line 1
Address Line 2
City
State
Zip
Physical Address
Address Line 1
Address Line 2
City
State
Zip

Students
This tab is a table listing all students linked to the guardians previously specified and can be used to add the guardian to specific students.

Add new relationship
This adds additional students to the linked guardians

Details Tab
Select Student
Clicking the dropdown list arrow will open a list of all students in the district that can be added to this relationship
Relationship Type
Clicking the dropdown arrow offers several types of guardians
Resides with Student
Indicates that the student lives with the guardian when checked
Allow Contact
Indicates that contact is allowed when checked
Active
Activates this students link to the guardian when checked
Click Add Relationship when Finished
Notes Tab
This area give the user an area for notes. The note pad has the following tools:
Spell Check
Bold Text
Italk Test
Underline Text
Indent
Outdent
Numbered List
Bullet List
Add HyperlInk
Remove Hyperlink
Toggle Full Screen Mode
Audit Tab
Audit Information is a basic timeline including the following:
Created on
Created by
Modified on
Modified by
Portal Access
Account
Username
The users district email account
Password
Passwords should be generated at district level. We should not enter it here for security purposes.
Confirm Password
Same as above
Account Status
Locked Out
Used to lock account
Has Portal Access
If checked the user has access to the Mileposts Portal
Last Activity
Used to see last activity
Last Login
Used to see the users last login
Last Password Change
The last time and date that the users password was changed
Last Lock Out
Last time the user was locked out
Failed Password Attempts
The count of failed attempts entering password
Failed Password Window Start

Audit Tab
Audit Information is a basic timeline including the following:
Created on
Created by
Modified on
Modified by

Delete Guardian
Click The garbage can to delete a guardian
Headers
First Name
Of guardian
Last Name
Of guardian
Status
True = Active False = Inactive
Has Portal Access
Indicates that the guardian has access to the guardian portal if marked yes
Number of Students
The number of students linked to the guardian

Portal Invitation Codes
These are used to send specific guardians individual invitations to the Portal
Filters
School
A list of all schools in the district including the district as a whole
Class
A list of all classes within the selected school
Invitation Status
Show All
Pending
Accepted
Declined

Filter
Last Name
First Name
Starts with
Type the students name based on Last or First Name from Filter (at least 3 characters the more characters the narrower the result
Click the Blue Arrow to filter

The table can be exported as:
Excel
Or
CSV

Print Selected
Clicking the checkbox next to a record makes it possible to print the selected record

Table Headers
Student First Name
Student Last Name
Student Number
Invitation Code
Invitation Status
Pending
Accepted
Declined
Issued On
Date issued
Accepted On
Date Accepted
Code Count

Related Articles
Organizational Groups
Organizational Groups are used to group users based on their organization/school. This is different from Groups or User Tags. Groups are based on the permissions that a user is granted. User Tags are used to group users based on similar ...User Accounts
Click User Accounts First page of User Accounts is a table of users The headers on the table are: Action Used to edit (pencil icon) or delete (garbage can) users First Name Users First Name Last Name Users Last Name ID Users Identification Status ...User Accounts
Login to EdHub as an Adminstrator Click Admin Click User Accounts First page of User Accounts is a table of users The headers on the table are: Action Used to edit (pencil icon) or delete (garbage can) users First Name Users First Name Last Name ...Family Management
In the Family Management section Guardian List and Portal Invitation Codes can be managed Click Family Management Here there are two choices: Manage Guardian List Guardian List is a table with all the parents that have access to their students ...User Tags
User Tags are used to group staff members with similar characteristics. This is different from groups because groups are associated with permissions. User Tags is for people of a common type (ie math teachers, teachers with less than 3 yrs experience ...