Managing Behavior Incident Types
Districts can customize the behavior types that are available in Mileposts behavior tool to align with the districts terms or policies.
Login to Mileposts
NOTE: This needs to be done by an administrator.
Click Admin

Click Behavior Setup

Find Incident Type
Click Edit Items

The table that is opened shows all current Incident Types. The Incident Types can be edited deleted or new ones can be added.
Edit Incident Types
Find the Incident Type that needs editing
Click The Pencil

This opens a window for editing the following
Active
Activate by checking the box. Deactivate by unchecking the box
Name
Name the Incident Type
Description
Give a description of what the Incident is.
Public Key
This will auto generate from the name field (no action is necessary)
State Code
If the Incident is reported to the state add the state code here
Do Soft Validation
Text that is displayed when either a specific incident type is selected AND/OR when a specific option set field has focus. This will also be displayed in red if this box is checked. (ie. When a specific incident type is selected, at least one ‘victim type’ must be selected).
Default Value for this Set
Determines if the Default value is set manually or automatically
Create By Import
This is for documenting how the default Value was set automatically or manually.
Click Save

Delete an Incident Type
Click the Garbage Can
Confirm the Deletion

Add New Incident
Click Add New Behaviour Option Item
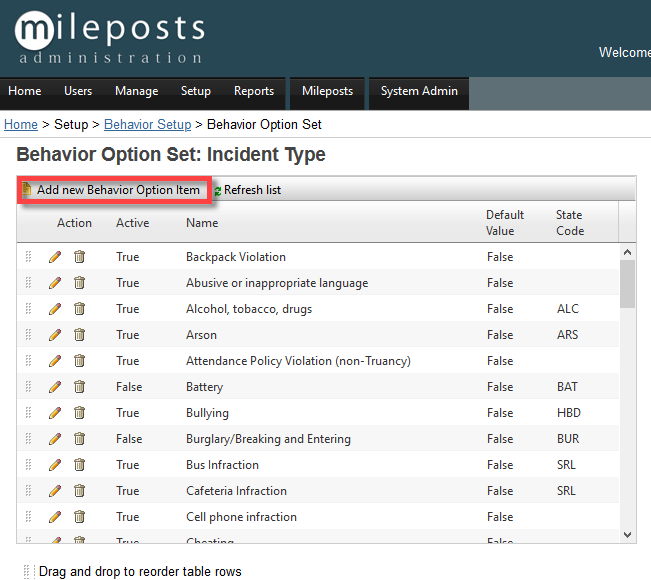
This opens a window for editing the following
Active
Activate by checking the box. Deactivate by unchecking the box
Name
Name the Incident Type
Description
Give a description of what the Incident is.
Public Key
This will auto generate from the name field (no action is necessary)
State Code
If the Incident is reported to the state add the state code here
Do Soft Validation
Text that is displayed when either a specific incident type is selected AND/OR when a specific option set field has focus. This will also be displayed in red if this box is checked. (ie. When a specific incident type is selected, at least one ‘victim type’ must be selected).
Default Value for this Set
Determines if the Default value is set manually or automatically
Create By Import
This is for documenting how the default Value was set automatically or manually.
Click Save
Related Articles
Creating Behavior Incident for Multiple Students
You have the ability to create a behavior incident for more than one student by completing a single behavior incident report. When you complete a behavior incident that will be documented in multiple student files. The same incident report is ...Video: Managing Behavior Incidents
This 4 minute training video provides an overview of how to manage Behavior Incidents within Mileposts. To just see a quick refresher of the product capabilities start at 1:25 in the video. https://youtu.be/vVZrBk-lQL4Video: Creating a Behavior Incident
This 5 minute training video provides an overview of how to create a new Behavior Incident within Mileposts. To just see a quick refresher of the product capabilities start at 2:20 in the video. https://youtu.be/FgKeanb__sgCreating a Behavior Incident
Creating a Behavior Incident The behavior tab of the student e-file is a place where behavior incidents can be housed and tracked in EdHub. Educators understand the power of having behavior, assessment data, and education support practices all ...Securable Behavior Incident Portal
This securable provides access to log and manage Behavior Incidents for any student. This feature is handy for school district employees who typically do not have scope to students, for example, bus drivers, but need to participate in a student's ...