Importing and Export Users
Importing/Export Users
Importing Overview
The EdFolio employee importer will allow you to import employees from a Comma Separated Values (CSV) file on a first time and ongoing basis. You must be signed in as a Vitae Administrator to perform this operation. Employees may also be added manually in the Vitae Manage Employees area. A district should choose to add employees either manually or via an import process and not use both methods unless they fully understand the gotchas.
Please read the section Gotchas and Words of Caution for more details.
Import File Format
The EdFolio Importer can import a comma delimited file. The fields are identified by column headers and can therefore be in any order. The column headers do need to match the column headers as shown in the following table. The Vitae importer is expecting a file that has all of your employees in it and will mark existing Employees inactive if they are not in the file. Do not import a file that does not have all of your employees in it!
The more information that you can provide the better. Your experience in EdFolio will be a much richer experience as you provide more detail about your employees.
Importing Instructions
Log into EdFolio as an Administrator
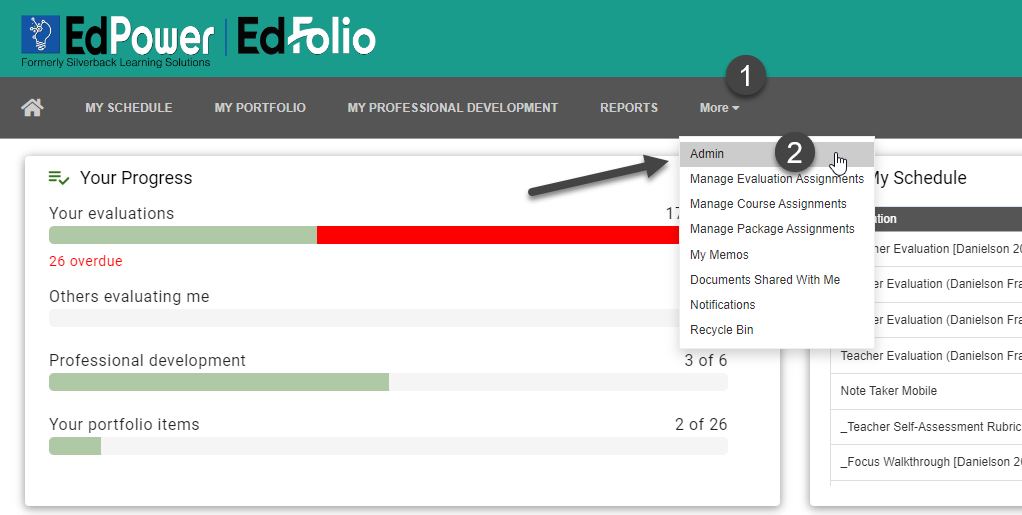
Hover over “More”
Click on “Admin”
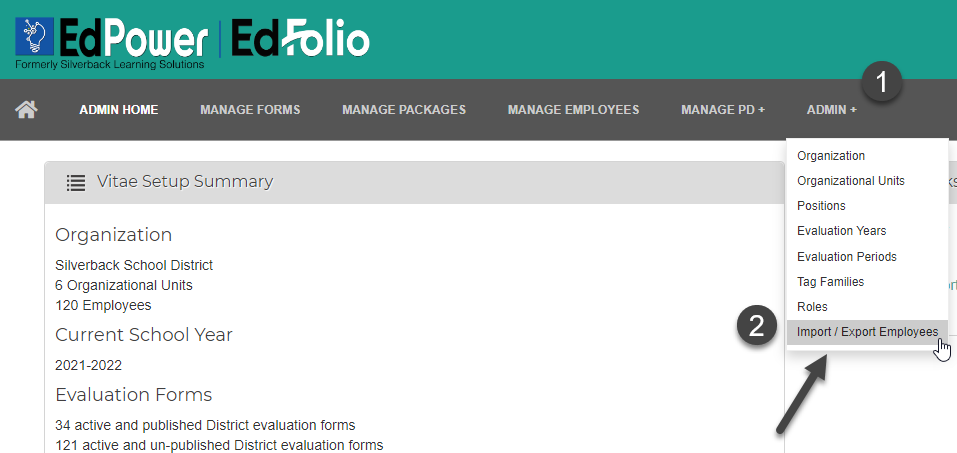
Hover over “Admin+”
Click on Import/Export Employees
Click on “+Import”

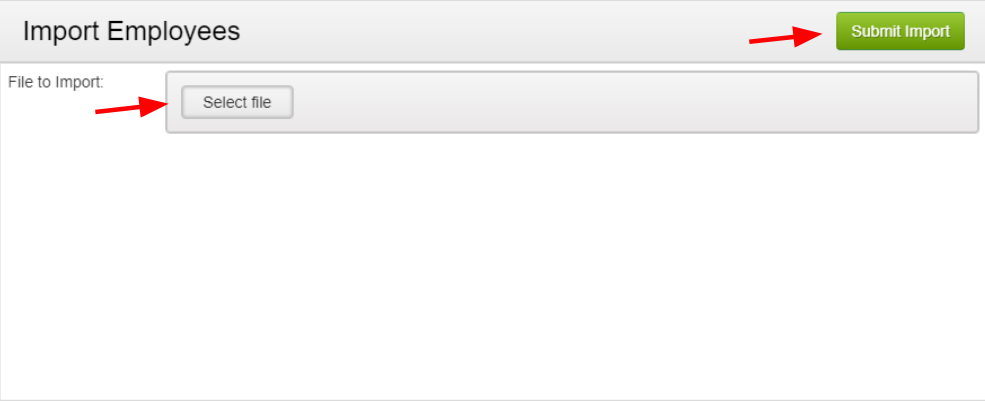
Select the file to Import from your computer
Click “Select file”
Find the file in your drive
Click “Submit”
The importer will upload and process your file. When it has finished it will close that window and refresh the list of Imports.
Click on the View button to view the details of the import. Check this carefully for errors and warnings.
Importing Gotchas and Words of Caution
A district should choose to add employees either manually or via an import process and not use both methods without understanding some of the complications of using both methods and how to avert issues.
The import process will use the column labeled SyncId to uniquely identify each employee. The importer will see if there is already an employee with the same SyncId in the database and if there is it will update that record and not insert a new record. The problems can arise if you manually enter a new employee and you do not specify a SyncId for that employee and then attempt to import that employee down the road with a new or different SyncId. The importer will not find that employee and will insert a new record and now you have two employee records for the same employee.
Lesson - If you manually enter a user please specify the SyncId that will be used during any imports down the road.
The other word of caution is that you must always provide a full import file. i.e. You import file must contain all employees currently active in your district. This is the only way that the importer can determine if an employee has left your district. If an active employee is no longer in the import file, the import process will assume that employee no longer works at your district and will mark them inactive.
If you have any further questions, please contact our support staff or submit a support ticket.
Export Instructions
Log into EdFolio as an Administrator
Hover over “More”
Click on “Admin”
Hover over “Admin +”
Click “Import/Export Employees”
Click on “+ Export”

Find your file in your downloads
Go into Excel/Sheets: Fill in the state identifier column I from offline DB

Note: Don’t touch syncID field column C: This will need to stay the same, or if one wasn’t entered manually when the employee was added, the system will automatically assign one.
Related Articles
Importing Users
Importing Users Log into Teacher Vitae Hover over “More” Click on “Admin” Hover over “Admin +” Click “Import/Export Employees” Click on “+Import” Select the file to Import from your computer 8. Click “Select file” 9. Find the file in your drive 10. ...5_Importing Staff
Importing Overview The Teacher Vitae employee importer will allow you to import employees from a Comma Separated Values (CSV) file. You must be signed in as a Vitae Administrator to perform this operation. Prerequisites OU’s need to be set up in ...Exporting Users
Exporting Users Log into Teacher Vitae Hover over “More” Click on “Admin” Hover over “Admin +” Click “Import/Export Employees” Click on “+ Export” Find your file in your downloads Go into Excel/Sheets: Fill in the state identifier column I from ...Adding an Employee Manually
Adding an employee manually A district should choose to add employees either manually or via an import process and not use both methods without understanding some of the complications of using both methods and how to avert issues. Importing Gotchas ...Adding Employees Manually
When adding multiple employees to Teacher Vitae it is always better to do an employee upload rather than to add employees manually. To add employees with an upload use the following link for step by step instructions. Update Staff There are times ...